Tutorials
Also check out our Blog for good tips and the latest news!
Adding an existing PyTorch training script into MLBench
In this tutorial, we will go through the process of adapting existing distributed PyTorch code to work with the MLBench framework. This allows you to run your models in the MLBench environment and easily compare them with our reference implementations as baselines to see how well your code performs.
MLBench is designed to easily be used with third-party models, allowing for quick and fair comparisons by standardizing the data distribution, evaluation dataset and providing evaluation code. It saves all of the hassle that’s needed to implement your own baselines for comparison.
We will adapt the code from the official PyTorch distributed tutorial to run in MLBench. If you’re unfamiliar with that tutorial, it might be worth giving it a quick look so you know what we’re working with.
Adapting the Code
To get started, create a new directory mlbench-pytorch-tutorial and copy the train_dist.py file into it.
The official tutorial spawns multiple parallel processes on a single machine, but we want to run the code on multiple machines, so first we need to replace the initialization functionality with our own.
Replace
 1if __name__ == "__main__":
 2    size = 2
 3    processes = []
 4    for rank in range(size):
 5        p = Process(target=init_processes, args=(rank, size, run))
 6        p.start()
 7        processes.append(p)
 8
 9    for p in processes:
10        p.join()
with
1if __name__ == "__main__":
2    parser = argparse.ArgumentParser(description='Process run parameters')
3    parser.add_argument('--run_id', type=str, help='The id of the run')
4    parser.add_argument('--rank', type=int, help='The rank of this worker')
5    parser.add_argument('--hosts', type=str, help='The list of hosts')
6    args = parser.parse_args()
7    init_processes(args.rank, args.run_id, args.hosts)
and add
1import argparse
to the top of the file.
We also need to change the init_processes method to reflect our previous changes, along with setting the WORLD_SIZE and RANK environment variables:
 1def init_processes(rank, run_id, hosts, backend='gloo'):
 2    """ Initialize the distributed environment. """
 3    hosts = hosts.split(',')
 4    os.environ['MASTER_ADDR'] = hosts[0] # first worker is the master worker
 5    os.environ['MASTER_PORT'] = '29500'
 6    world_size = len(hosts)
 7    os.environ['WORLD_SIZE'] = str(world_size)
 8    os.environ['RANK'] = str(rank)
 9    dist.init_process_group(backend, rank=rank, world_size=len(world_size))
10    run(rank, world_size, run_id)
Next, we need to change the signature of the run method to add the run_id parameter. The run_id is a unique identifier automatically assigned
by MLBench to identify an individual run and all its data and performance metrics.
1def run(rank, size, run_id):
At this point, the script could technically already run in MLBench. However, you would not be able to see any reported results or intermediate stats during training. Results are shown either in the Dashboard (where you can see them in real time) or can be downloaded at any time during the run from the command line. So let’s add some reporting functionality.
The PyTorch script reports loss to stdout, but we can easily report the loss to MLBench as well. First we need to import the relevant MLBench
functionality by adding the following line to the imports at the top of the file:
1from mlbench_core.utils import Tracker
2from mlbench_core.evaluation.goals import task1_time_to_accuracy_goal
3from mlbench_core.evaluation.pytorch.metrics import TopKAccuracy
4from mlbench_core.controlflow.pytorch import validation_round
task1_time_to_accuracy_goal measures the time taken to reach 80% accuracy.
After this we can simply create a Tracker object and use it to report the loss and add metrics (TopKAccuracy) to track. We add code to record the timing of different steps with tracker.record_batch_step().
We have to tell the tracker that we’re in the training loop by calling tracker.train() and that the epoch is done by calling tracker.epoch_end(). The loss is recorded with tracker.record_loss().
 1def run(rank, size, run_id):
 2    """ Distributed Synchronous SGD Example """
 3    torch.manual_seed(1234)
 4    train_set, bsz = partition_dataset()
 5    model = Net()
 6    optimizer = optim.SGD(model.parameters(), lr=0.01, momentum=0.5)
 7    metrics = [                                     # Add metrics to gather
 8        TopKAccuracy(topk=1),
 9        TopKAccuracy(topk=5)
10    ]
11    loss_func = nn.NLLLoss()
12
13    tracker = Tracker(metrics, run_id, rank)        # Instantiate a Tracker
14
15    num_batches = ceil(len(train_set.dataset) / float(bsz))
16
17    tracker.start()                                 # Start the tracker
18
19    for epoch in range(10):
20        tracker.train()                             # Record training start
21
22        epoch_loss = 0.0
23        for data, target in train_set:
24            tracker.batch_start()                   # Record batch start
25
26            optimizer.zero_grad()
27            output = model(data)
28
29            tracker.record_batch_step('forward')    # Record batch forward step
30
31            loss = loss_func(output, target)
32            epoch_loss += loss.data.item()
33
34            tracker.record_batch_step('loss')       # Record batch loss step
35
36            loss.backward()
37
38            tracker.record_batch_step('backward')   # Record batch backward step
39
40            average_gradients(model)
41            optimizer.step()
42
43            tracker.batch_end()                     # Record batch end
44
45        tracker.record_loss(epoch_loss, num_batches, log_to_api=True)
46
47        logging.debug('Rank %s, epoch %s: %s',
48                    dist.get_rank(), epoch,
49                    epoch_loss / num_batches)       # Print to stderr
50
51        tracker.epoch_end()                         # Record epoch end
52
53        if tracker.goal_reached:                    # Goal reached
54            logging.debug("Goal Reached!")
55            return
That’s it. Now the training will report the loss of each worker back to the Dashboard and the output result files. On the Dashboard, you will also see a nice graph showing this data.
For the official tasks, we also need to report validation stats to the tracker and use the official validation code. Rename the current partition_dataset() method to partition_dataset_train
and add a new partition method to load the validation set:
 1def partition_dataset_val():
 2    """ Partitioning MNIST validation set"""
 3    dataset = datasets.MNIST(
 4        './data',
 5        train=False,
 6        download=True,
 7        transform=transforms.Compose([
 8            transforms.ToTensor(),
 9            transforms.Normalize((0.1307, ), (0.3081, ))
10        ]))
11    size = dist.get_world_size()
12    bsz = int(128 / float(size))
13    partition_sizes = [1.0 / size for _ in range(size)]
14    partition = DataPartitioner(dataset, partition_sizes)
15    partition = partition.use(dist.get_rank())
16    val_set = torch.utils.data.DataLoader(
17        partition, batch_size=bsz, shuffle=True)
18    return val_set, bsz
Then load the validation set and add the goal for the official task (The Task 1a goal is used for illustration purposes in this example):
 1def run(rank, size, run_id):
 2    """ Distributed Synchronous SGD Example """
 3    torch.manual_seed(1234)
 4    train_set, bsz = partition_dataset_train()
 5    val_set, bsz_val = partition_dataset_val()
 6    model = Net()
 7    optimizer = optim.SGD(model.parameters(), lr=0.01, momentum=0.5)
 8    metrics = [
 9        TopKAccuracy(topk=1),
10        TopKAccuracy(topk=5)
11    ]
12    loss_func = nn.NLLLoss()
13
14    goal = task1_time_to_accuracy_goal
15
16    tracker = Tracker(metrics, run_id, rank, goal=goal)
17
18    num_batches = ceil(len(train_set.dataset) / float(bsz))
19    num_batches_val = ceil(len(val_set.dataset) / float(bsz_val))
20
21    tracker.start()
Now all that is needed is to add the validation loop code (validation_round()) to run validation in the run() function. We also check if the goal is reached and stop training if it is.
validation_round() evaluates the metrics on the validation set and reports the results to the Dashboard.
 1tracker.record_loss(epoch_loss, num_batches, log_to_api=True)
 2
 3logging.debug('Rank %s, epoch %s: %s',
 4              dist.get_rank(), epoch,
 5              epoch_loss / num_batches)
 6
 7validation_round(val_set, model, loss_func, metrics, run_id, rank,
 8                  'fp32', transform_target_type=None, use_cuda=False,
 9                  max_batch_per_epoch=num_batches_val, tracker=tracker)
10
11tracker.epoch_end()
12
13if tracker.goal_reached:
14    logging.debug("Goal Reached!")
15    return
The full code (with some additional improvements) is in our Github Repo.
Creating a Docker Image for Kubernetes
To actually run our code, we need to wrap it in a Docker Image. We could create one from scratch, but it’s easier to use the PyTorch Base image provided by MLBench, which already includes everything you might need for executing a PyTorch model.
Create a new file called Dockerfile in the mlbench-pytorch-tutorial directory and add the following code:
 1FROM mlbench/mlbench-pytorch-base:latest
 2
 3RUN pip install mlbench-core
 4
 5# The reference implementation and user defined implementations are placed here.
 6# ADD ./requirements.txt /requirements.txt
 7# RUN pip install --no-cache-dir -r /requirements.txt
 8
 9RUN mkdir /codes
10ADD ./train_dist.py /codes/train_dist.py
11
12EXPOSE 29500
13
14ENV PYTHONPATH /codes
The mlbench-pytorch-base:latest image already contains all necessary libraries, but if your image requires additional python libraries, you can add them with the commands on lines 6 and 7, along with adding a requirements.txt file.
In order for Kubernetes to access the image, you have to build and upload it to a Docker registry that’s accessible to Kubernetes, for instance Docker Hub (Make sure to change the Docker image and repo name accordingly):
$ docker login
$ docker build -t <user|organisation>/<name>:latest mlbench-pytorch-tutorial/
$ docker push mlbench/pytorch-tutorial:latest
The image is now built and available for running in MLBench.
Running the code in MLBench
Navigate to the MLBench Dashboard and go to the Runs page.
Create a new Run:

Enter the URL of the newly uploaded Docker image (The host can be left out if you use Docker Hub). Then enter the command to execute on each worker:
/conda/bin/python /codes/train_dist.py --hosts {hosts} --rank {rank} --run_id {run_id}
The values in brackets will be substituted by MLBench with the correct values and passed to our script.
We also need to choose which backend we want to run on (in our case, MPI) and set the number of workers on which we want to execute our run.
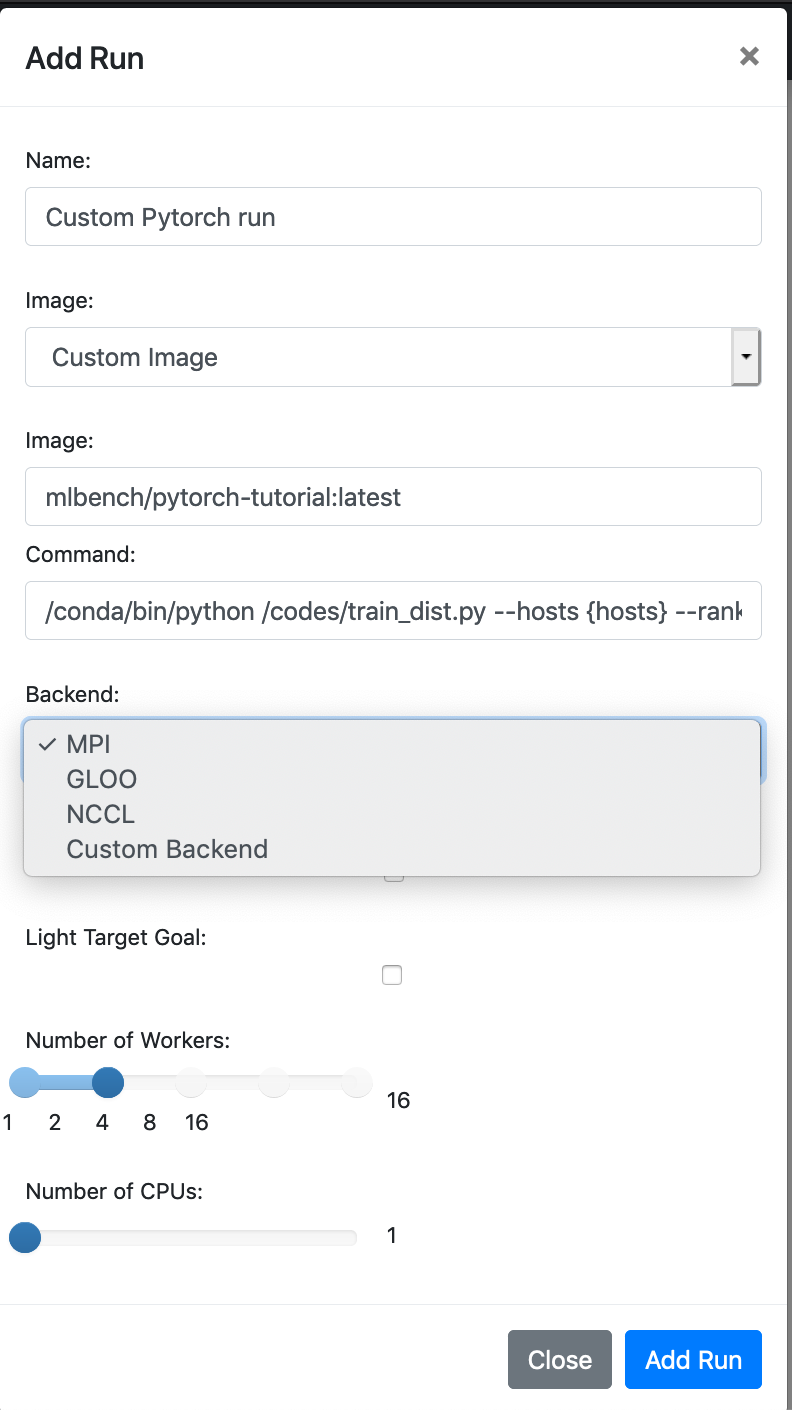
Now we’re all set to start our experiment. Hit Add Run and that’s it. You just ran a custom model on MLBench.
If you are only running from the command line, you can execute:
mlbench run custom-pytorch-run 2
When prompted, choose Custom Image and enter the image and execution command.
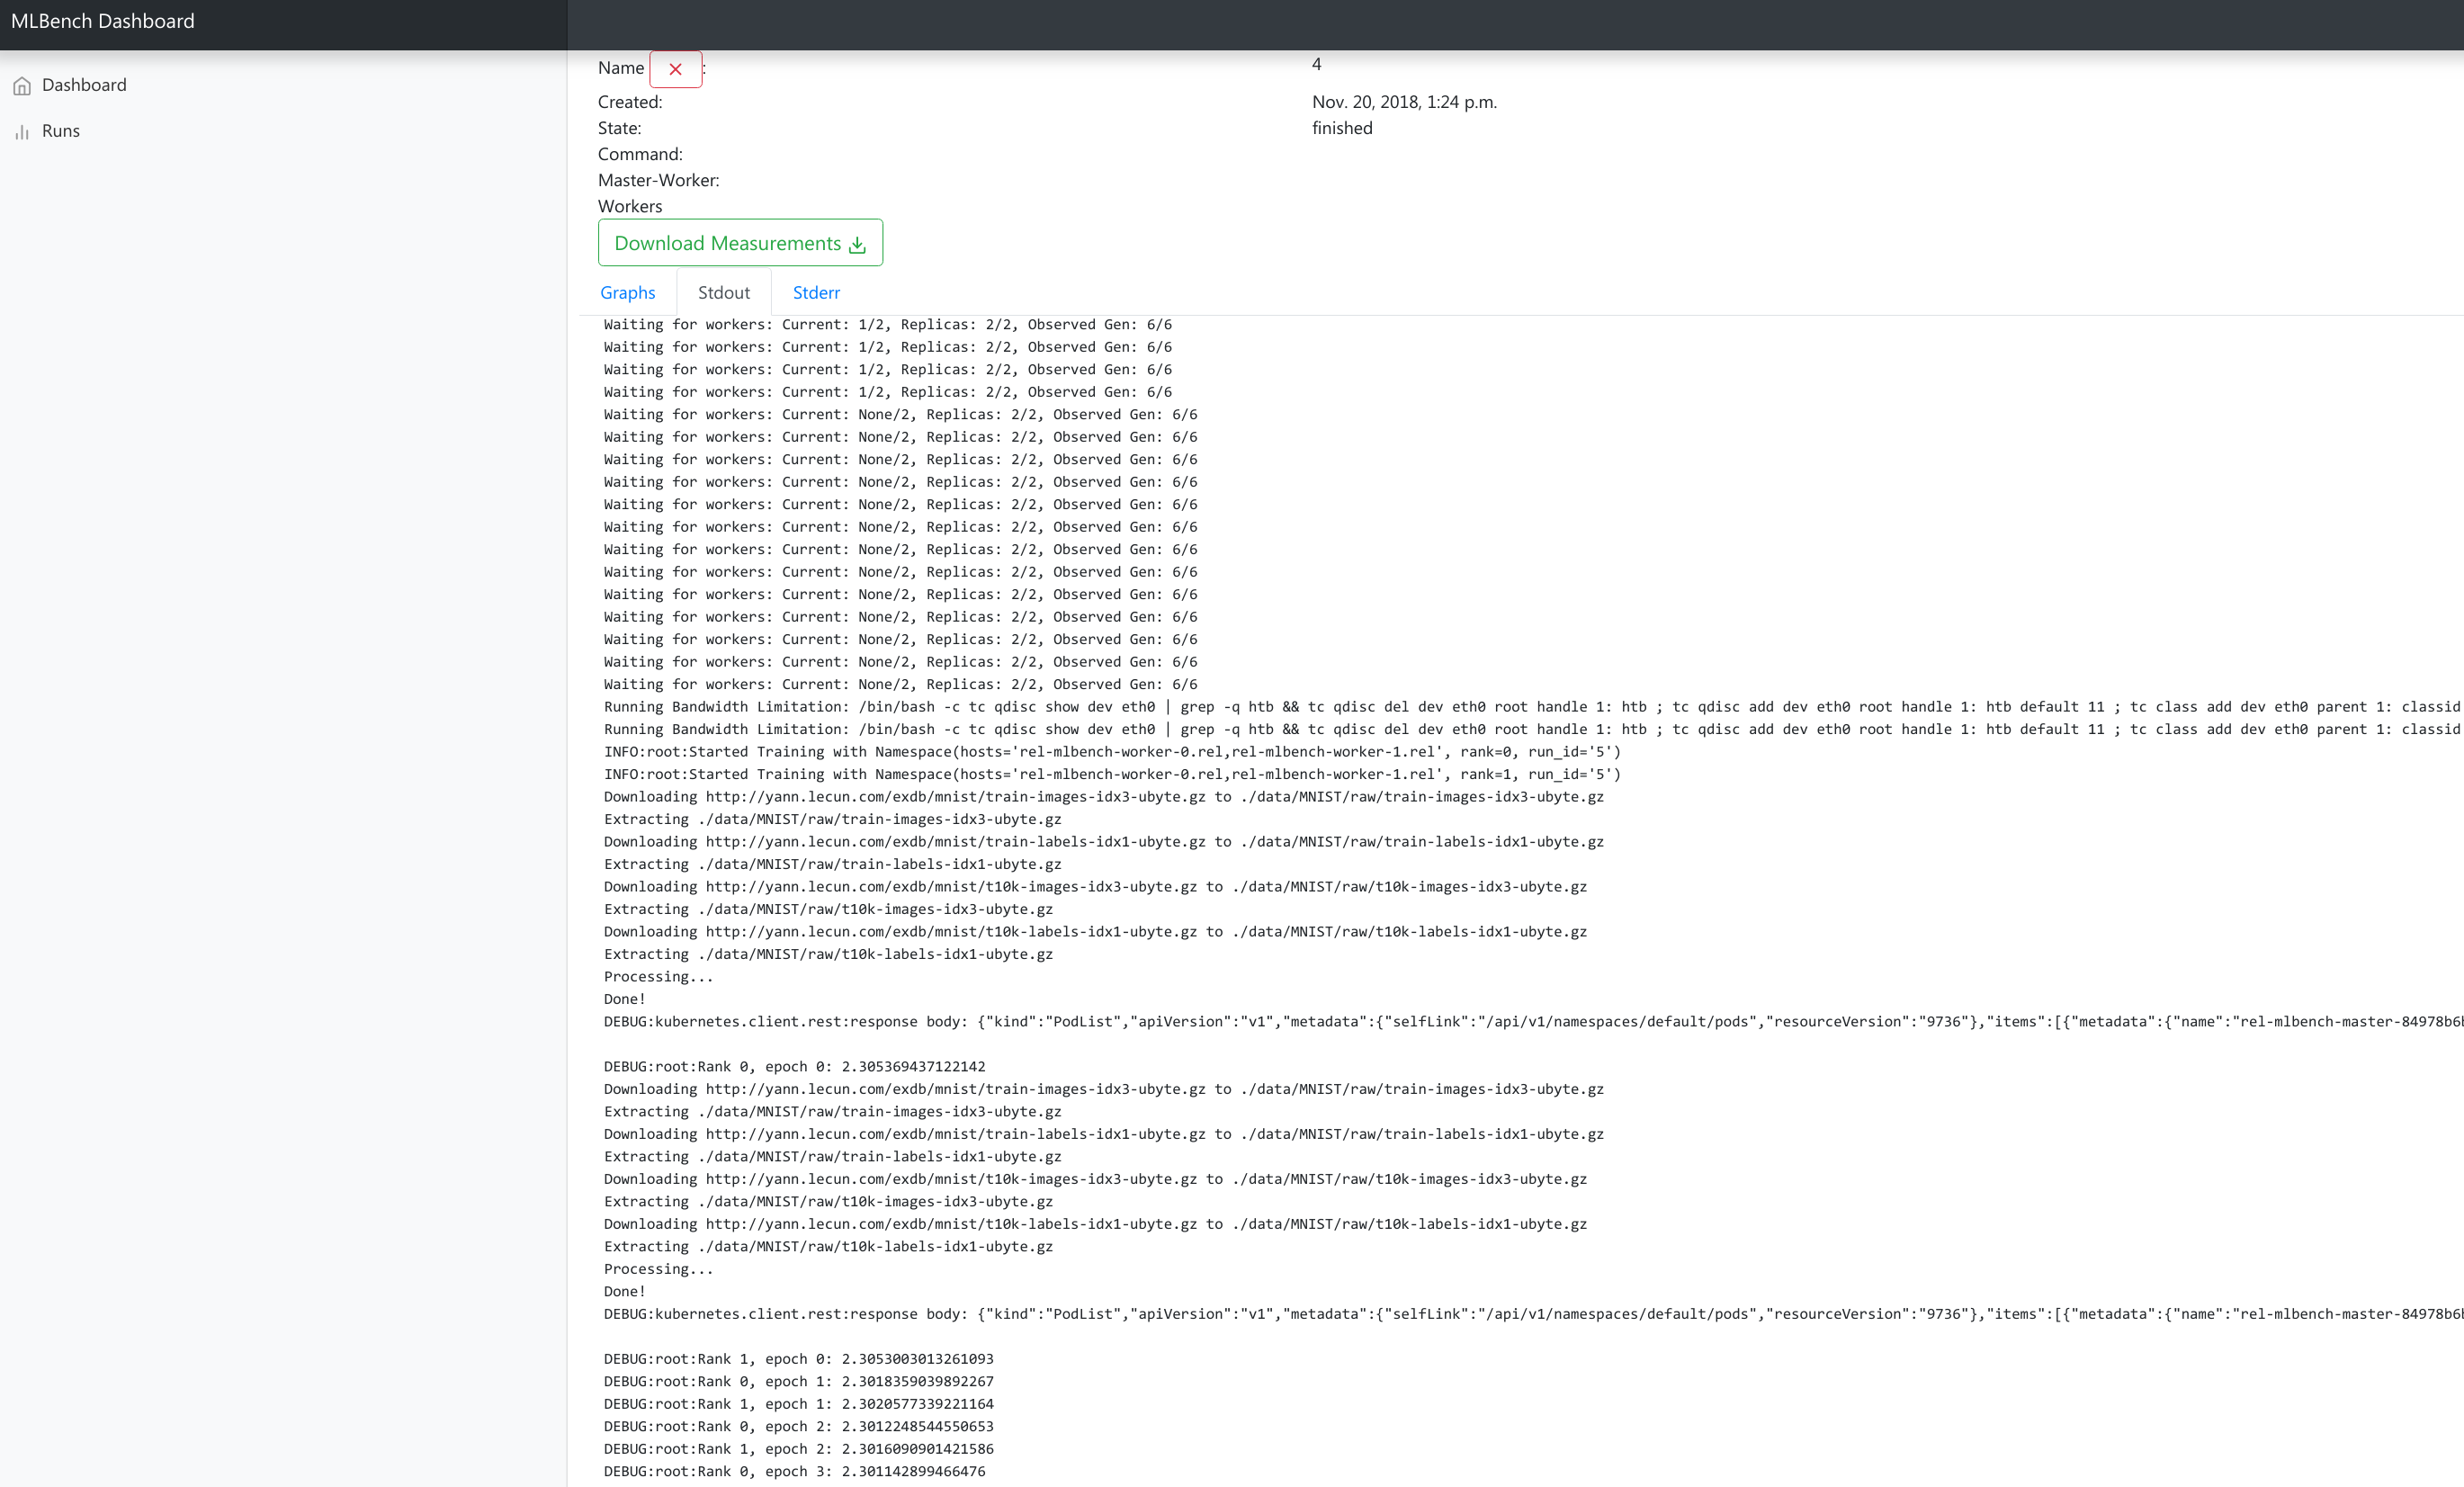
If you are using the Dashboard, you should see a graph of the training loss of each worker, along with the combined stdout and stderr of all workers.
If you are running from the command line, you will see these printed to your terminal
and will be able to access the training data and results using mlbench download <run_name>
(check out our tutorial on Using the MLBench Command-Line Interface for more information).
Using the MLBench Command-Line Interface
In this tutorial we’ll introduce the CLI and show you how easy it is to get it up and running.
Please beware any costs that might be incurred by running this tutorial on the Google cloud. Usually costs should only be on the order of 5-10USD. We don’t take any responsibility for the costs incurred
Install the mlbench-core python package by running:
pip install mlbench-core
After installation, mlbench is usable by calling the mlbench command.
MLBench supports multiple clouds, but for the purposes of this tutorial we will focus on Google Cloud. To create a new Google cloud cluster, simply run (this might take a couple of minutes):
$ mlbench create-cluster gcloud 3 my-cluster
[...]
MLBench successfully deployed
This creates a cluster with 3 nodes called my-cluster-3 and sets up the mlbench deployment in that cluster. Note that the number of nodes should always be 1 higher than the maximum number of workers you want to run.
To start an experiment, simply run:
$ mlbench run my-run 2

Benchmark:

[0]     PyTorch Cifar-10 ResNet-20
[1]     PyTorch Cifar-10 ResNet-20 (Scaling LR)
[2]     PyTorch Linear Logistic Regression
[3]     PyTorch Machine Translation GNMT
[4]     PyTorch Machine Translation Transformer
[5]     Tensorflow Cifar-10 ResNet-20 Open-MPI
[6]     PyTorch Distributed Backend benchmarking
[7]     Custom Image

Selection [0]: 1
Backend:

[0]     MPI
[1]     GLOO
[2]     NCCL
[3]     Custom Backend

Selection [0]: 0

[...]

Run started with name my-run-2
You will be prompted to select the benchmark image you want to run (or to specify a custom image). Afterwards, a new benchmark run will be started in the cluster with 2 workers.
You can also start multiple runs at the same time, which will be scheduled as nodes become available:
$ mlbench run my-run 2 4 8 16

Benchmark:

[0]     PyTorch Cifar-10 ResNet-20
[1]     PyTorch Cifar-10 ResNet-20 (Scaling LR)
[2]     PyTorch Linear Logistic Regression
[3]     PyTorch Machine Translation GNMT
[4]     PyTorch Machine Translation Transformer
[5]     Tensorflow Cifar-10 ResNet-20 Open-MPI
[6]     PyTorch Distributed Backend benchmarking
[7]     Custom Image


Selection [0]: 1
Backend:

[0]     MPI
[1]     GLOO
[2]     NCCL
[3]     Custom Backend

Selection [0]: 0

[...]

Run started with name my-run-2
Run started with name my-run-4
Run started with name my-run-8
Run started with name my-run-16
which would start runs with 2, 4, 8 and 16 workers, respectively.
To see the status of a run, execute:
$ mlbench status my-run-2
[...]
id      name    created_at            finished_at state
---     ------  -----------            ----------- -----
1       my-run-2 2019-11-11T13:35:06              started
No Validation Loss Data yet
No Validation Precision Data yet
After the first round of validation, this command also outputs the current validation loss and precision.
To download the results of a current or finished run, use:
$ mlbench download my-run-2
which will download all the metrics of the run as a zip file. This file also contains the official benchmark result once the run finishes, in the form of the official_result.txt.
You can also access all the information of the run in the dashboard. To get the dashboard URL, simply run:
$ mlbench get-dashboard-url
[...]
http://34.76.223.123:32535
Don’t forget to delete the cluster once you’re done!
$ mlbench delete-cluster gcloud my-cluster-3
[...]
NOTE: if you created a cluster in a non-default zone using the -z flag,
you also need to delete it by passing the same flag and argument to mlbench delete-cluster.
# create cluster in europe-west2-b (non-default)
$ mlbench create-cluster gcloud -z europe-west2-b 3 my-cluster

# delete cluster
$ mlbench delete-cluster gcloud -z europe-west2-b my-cluster-3
Using Kubernetes-in-Docker (KIND) for development and debugging
Developing distributed applications can be a burden because it requires a cluster of machines to be available. This induces additional costs that are really not necessary. Luckily, KIND can be very helpful.
KIND allows for deployment of a kubernetes cluster locally on your machine, using docker, and unlocks testing and development without an available “real” cluster of machines.
To deploy a KIND cluster locally, use the following command:
$ mlbench create-cluster kind 3 my-cluster
[...]
MLBench successfully deployed
This will create a “kind” cluster of size 3 nodes, called my-cluster. The dashboard will be available on one running image,
and the two workers allow you to run some code.
Additionally, this command will also deploy a local docker registry at localhost:5000, which allows the use of local images instead of having to
pull them for a remote location, and connects the created cluster to it (through docker networks).
$ docker ps
CONTAINER ID        IMAGE                   COMMAND                  CREATED             STATUS              PORTS                       NAMES
54bc6050b3a1        kindest/node:v1.15.12   "/usr/local/bin/entr…"   5 minutes ago       Up 5 minutes                                    my-cluster-3-worker
3b5579d64a78        kindest/node:v1.15.12   "/usr/local/bin/entr…"   5 minutes ago       Up 5 minutes        127.0.0.1:40583->6443/tcp   my-cluster-3-control-plane
d4612a2c913c        kindest/node:v1.15.12   "/usr/local/bin/entr…"   5 minutes ago       Up 5 minutes                                    my-cluster-3-worker2
3624c7f747e3        registry:2              "/entrypoint.sh /etc…"   4 days ago          Up 17 hours         0.0.0.0:5000->5000/tcp      kind-registry
To push an image to the local registry (and have it available for the cluster), use the following commands:
$ docker tag <repo>/<image>:<tag> localhost:5000/<image>:<tag>
$ docker push localhost:5000/<image>:<tag>
At this point, the image <image>:<tag> will be available for use locally.
$ mlbench run test 2

[0]     PyTorch Cifar-10 ResNet-20
[1]     PyTorch Cifar-10 ResNet-20 (DDP)
[2]     PyTorch Linear Logistic Regression
[3]     PyTorch Language Modeling (AWD-LSTM)
[4]     PyTorch Machine Translation GNMT
[5]     PyTorch Machine Translation Transformer
[6]     Tensorflow Cifar-10 ResNet-20 Open-MPI
[7]     PyTorch Distributed Backend benchmarking
[8]     Custom Image

Selection [3]: 8
Image:  localhost:5000/<image>:<tag>
Command: <command-to-run>
The command to run the image should be a python script with arguments run_id, rank, hosts and backend. For official images, we use the command:
/conda/bin/python /codes/main.py --run_id {run_id} --rank {rank} --hosts {hosts} --backend {backend}